Saturday, July 30, 2011

Garden Squares

One of my favorite things about summer is going to the fair. And what are two of the best parts of the fair? Of course...the food and the quilts! 


So when I saw AnneMarie's genius idea of the Summer Fair, I knew I wanted to be a part of it. The only problem was that the only quilt I have ever made all by myself lives almost 1,000 miles from me and I really didn't take many good pictures of it before I sent it to my nephew. I know many other quilters would just whip out another quilt in a day or two, but with three little boys, even simple projects can take weeks. Luckily, I had another quilt that I started earlier this year sitting in my closet, patiently waiting. 


You see, early this spring I bought a new sewing machine and after I got it home I just HAD to make something. I'm a little impatient, so instead of taking the time to really plan out a quilt I just started cutting squares of my beloved Heather Bailey fabrics. Pretty soon it was sashed with some Kona Ash and the top was done. I got it backed and basted only to realize that the walking foot I had did not work with my new machine. So, the quilt got pushed to the side in favor of other sewing projects. I eventually got the walking foot but still put off finishing the quilt. 


Until I heard about the Summer Fair that is. I thought it sounded like so much fun that I brought the quilt out and got to work. A few naptimes later it was finished. My second quilt was officially done and I love it. I knew this quilt was going to be used for snuggling on the couch, so I didn't want to quilt it too heavily, just straight lines through the sashing, 1/4 inch from the seams. Kona ash was definitely the safest choice for the binding, but it is what I had on hand so that is what I used. Given more time I would have liked to have been more adventurous with my binding choice. I also sewed the binding on with my machine using Rita's tutorial. I am generally not a fan of machine-binding, but as I was pressed for time I thought I would give it a shot. It was easier than I expected, but I still prefer the look of hand-sewn binding. 

Overall, I am very happy with this quilt and learned several lessons. Most importantly, I have to pin more when I baste. The back of the quilt had several puckers that may have been prevented had I pinned a bit more. Also, I should have pressed the the top again before I quilted, but didn't want to take the time. Last, I really need to get better at recognizing the sound of an empty bobbin. Really. 

How could I leave you without giving you the inevitable "baby on the quilt" shot? You're welcome.


So there you have it. Thanks for checking out my exhibit at the Summer Fair!

Lemon Ricotta Muffins at the Fair

Is there anyone that doesn't enjoy going to the fair? 

Here in the Midwest, fairs are serious business. There are livestock to be worked and groomed, jams to be canned, and tractors to be pulled. But they are also so much fun! There are also water fights to be won, friends to see, and the best lemon shake-ups to drink. At our county fair we even have a cricket-spitting contest! I have never had the desire to enter it, but I'm continually amazed at the number of people who do.

Seriously, who doesn't feel just a little bit more patriotic and hopeful for the future after walking around seeing kids working their hardest to earn a ribbon? Around here, fairs really do bring out the best in people.

That's why I was so excited to see that the lovely AnneMarie of Gen X Quilters was hosting this: 

Quilts and cooking? Sign me up!

So for my part in the cooking festivities, I give you Lemon Ricotta Muffins. Don't they just sound good? And I guarantee they taste better than a cricket!

This recipe is from Giada de Laurentiis of the Food Network. The original recipe calls them biscuits, but they are not at all biscuit-like, so I call them muffins. 

     Lemon Ricotta Muffins
     2 cups all-purpose flour
     1/2 teaspoon baking powder
     1/2 teaspoon baking soda
     1/2 teaspoon salt
     1 cup plus 1 teaspoon sugar or more as needed for sprinkling
     1/2 cup (1 stick) unsalted butter, room temperature
     1 tablespoon finely grated lemon zest (from 2 lemons)
     1 cup whole-milk ricotta cheese
     1 large egg
     1 tablespoon fresh lemon juice
     1/2 teaspoon almond extract
     1/3 cup thinly sliced almonds

Line 12 muffin cups with paper liners. Preheat the oven to 350 degrees F.

Whisk the flour, baking powder, baking soda, and salt in a medium bowl to blend. Using an electric mixer, beat 1 cup sugar, butter, and lemon zest in a large bowl until light and fluffy. Beat in the ricotta. Beat in the egg, lemon juice, and almond extract. Add the dry ingredients and stir just until blended (the batter will be thick and fluffy).

Divide the batter among the prepared muffin cups. Sprinkle the almonds and then the remaining 1 teaspoon of sugar over the muffins. Bake until the muffins just become pale golden on top, about 20 minutes. Cool slightly. Serve warm or at room temperature.
 Fresh from the oven...
Doesn't that look good?

And how about those cupcake liners, or as my kids call them, "muffin peels" ? Aren't they cute? 
I found them at Ikea. I don't usually even use liners, but I liked these so much I went ahead and got some. They are a little oddly shaped, but once you get the batter in them they spread out a little more and aren't so rigid looking. 

These muffins freeze wonderfully. I made a big batch right before I had our youngest son and put them in the freezer as a quick breakfast for the other boys when I needed an easy way out.
Come back here tomorrow for a fresh new quilt!
 
I am so excited to be a part of this Summer Fair so I must give a big thank you to AnneMarie for hosting!  Now go check out the other goodies at the Fair!

Friday, July 29, 2011

My Take on the Gathered Clutch

I think that nearly every sewing blogger I follow has probably made a version of this little bag. Why? Because they are super cute, so easy to make, and everyone can use one. Or twelve. I have used several of Anna's tutorials and they are all very written and easy to follow.

So far I have finished two of these babies. Notice I said finished... I had some issues with the first one I attempted. Totally and completely due to my own sewing inabilities, but the next two went smoothly and turned out great.
Here is my first completed clutch:

 After the fiasco with my first one I decided to use fabrics that I really didn't care about in case I messed it up again. I still am not crazy about the green, but the fabric for the main part of the clutch has really grown on me. Here's the back so you can see it better.
You know how sometimes when you do something the first time, you do a really good job, but when you do it subsequent times it looks awful? Well such is the case with the zipper-tab-cover-things. I am really happy with how they came out on this bag, but the next one doesn't look good at all.
Not perfect, but I think they're great. I actually use this bag as my wallet in my diaper bag, so it has gotten a lot of abuse the last few months and held up well.  On the next clutch I decided to make it just a bit bigger and I used fusible fleece as the interfacing. I'm not sure what my logic was on that move, but it didn't turn out too bad. In fact, I used it to hold my make-up recently when we went on a trip to Cincinnati over the Fourth of July. Apparently I haven't worn make-up since that trip because I had to get it out of my suitcase to take these pictures.
I'm not sure why I made it into a wristlet, because it is too big to really use it that way. I think I just wanted to use the hardware.
And here we have the example of a poorly-made zipper cover, yet I had no desire to rip it apart and try again. Lazy much?

While I was cleaning out my wallet to take these pictures I remembered my fun checkbook cover I made using Crazymomquilt's tutorial.

So simple you really shouldn't need the tutorial, but I love seeing the fun fabric when it's time to pay the bills.

Thursday, July 28, 2011

I Found It!

You know that quilt I was telling you about the other day? The one I made in college that I got sick of after piecing the top and my dear mama finished for me? Well I found it this morning so I decided to have a little quilty photo shoot today to show some of my other quilts. I had forgotten about one that I made my first son when I was pregnant with him, so it got thrown on the line, too.


 And here she is, in all her glory. Looking at it today, I realized that I really do like this design, just not the execution. It is not even close to my style today, but who knows, maybe it will be in another ten years?

Here is a little closer view of the quilting. Mom hand quilted this, bless her. This quilt is about 81" by 91". I just don't have the patience for that kind of thing right now, but I'm glad she did.

Up next we have the quilt I made when I was pregnant with Wyatt. For some reason, I thought it would be a good idea to find out what we were having but not tell anyone else but my parents. But, I made this at my parents' house when we were there for Christmas, forgetting that my brother and sister and their families would then see it. Smart. So naturally they figured out we were having a boy, but I was only a month away from having him, so my game was fun for a little while anyway. It's about a 36" square.
Snazzy, huh?


Had I been paying any attention at all to what I was doing, I might have fussy cut those squares so there was actually a focal point in them instead of this:


Headless horsemen and stray butts

The final quilt on our tour today is the one I made for my middle son. Actually it basically matches the quilt I made for my oldest son except for the backing and a few fabrics.  And when I say "I" made them, I really mean I made the tops and Mom quilted and bound them. She's swell like that. They are both about 61" by 81".
Here's the thing about their quilts...my husband really thought they should have a John Deere bedroom. I really didn't. I have no problem with John Deere, they make great tractors, but I'm not all about plastering their stuff all over my house. Two-thirds of my kids' toys are John Deere so them not getting JD bedding doesn't break my heart. This was as close as I could do.
I really like the binding being orange. When I bought these fabrics I had never heard of any certain designers or modern quilting in general, I just bought what I liked. I think most of them came from Sew, Mama, Sew because I could use their "shop by color" feature.

Y'all are lucky you are even getting these pictures. Look at what was terrorizing me while I was trying to work:
He looks innocent, doesn't he?

Wednesday, July 27, 2011

First Tomatoes!

Guess who's having BLTs for supper?


Stuffed Pepper Skillet Meal

A few years ago, my garden produced an unbelievable amount of green bell peppers. We lived on some fertile sandy soil and must have gotten perfect conditions for pepper growing that year because I haven't had much luck with peppers since then. We had what seemed like bushels of peppers that year. Luckily my husband loves stuffed peppers. Honestly, before I met him I didn't know that anyone really loved stuffed peppers. I always tolerated them when my mom made them, but I have started liking them much more now.

That summer I made lots of stuffed peppers. I would make the filling then stuff it into the raw peppers, wrap them really well and stick them in the freezer. It was so easy to just take out one for Wyatt and I to share when Rog was working late, and also easy  for Rog to take one out of the freezer and zap in the microwave to heat up when he came home. I have seen recipes that instruct you to mix up the filling ingredients with raw meat and pack it in the peppers before baking, kind of like a mini meatloaf, but that always sounded gross to me, so I brown my ground beef before mixing the rest of the stuff in with it.

Now I have an even easier way to make my husband's beloved stuffed peppers. I use all the same ingredients, but I chop up the peppers and put everything in a skillet to cook on the stove top. Much faster and easier to both make and eat. My kids even really like it. Sometimes I will also use these same basic ingredients plus some beef broth and tomato sauce and make Stuffed Pepper Soup.

Here's what you'll need:
 
Pay no attention to the wild child in the back.


Stuffed Pepper Skillet

1 lb ground beef

1 medium onion, diced

1 or 2 green bell peppers, diced

½ C white rice

½ C water

1(16 oz) can diced tomatoes

2 TB worcestershire sauce

½ tsp salt

½ tsp pepper

Shredded cheese, about 1 cup or less


Brown the ground beef in a large skillet with a tight-fitting lid.  A few minutes before it is done, add in the onion and peppers. When the beef is done, drain and return to skillet. Add in the rice, water, and other remaining ingredients except the cheese. Cover the skillet, bring to a boil and reduce heat.  Simmer, covered, for 20 minutes or until rice is cooked through. Remove from heat and stir in shredded cheese. Enjoy!


The night I made this I served it with a salad and some cantaloupe that my trusty helper scooped out.

Maybe not the most photogenic meal, but definitely a quick, cheap, filling dish that tastes great, too! Also, don't you love how my "Here's what you need" picture really only shows half the stuff you need? Nothing short of perfection here, folks!

Tuesday, July 26, 2011

The Coolest Bib Around

One of the many things that I love about Pinterest is that of all the ideas and recipes I pin there, I find that I actually use them, not just pitch them into a folder on my computer never to see them again. Maybe it is the pictures that help keep my interest, or the easy organization, but I have actually tried quite a few of the recipes I have pinned, and have even found time for a little sewing lately.


I started my youngest son on real food about a month ago. Somehow, I had forgotten how messy it was! We have been going through several outfits a day, and I don't like laundry! At home, I really don't mind just taking his shirt off to keep it clean while he eats, but when we go out I think that might be a little tacky. All of my boys have hated wearing bibs and have been very efficient at yanking them off as soon as I get them on, but I think I have found a solution.  I found this "Bapron" tutorial from Craftiness is not Optional on Pinterest the other day and got a little crazy making them. They are so cute! And it doesn't take any time to sew a few of them up. I just used store-bought bias tape because I am lazy, but if I were making these as a gift I would definitely make my own since it would be so much cuter.


The pattern is very easy to follow. The only change I made was to add about another 1/2 inch or more on all sides. I made the first one the same size as the pattern and it was a little snug on my chunky baby. On one of the bibs,  I was a little short on bias tape, so instead of making the neckline go all the way up and tie, I just covered the neckline of the fabric. If he is really fussing with it, he can get this one off now, but it stayed on really well the first few times. It kinda looks like an art smock, so maybe I can just scale up the pattern and try that for the older boys.

I actually tried making one with some of the iron-on vinyl so that it would clean a little easier, but I forgot that you are supposed to hand wash anything you make with that stuff. Around here, nothing gets hand washed so it got thrown in the washer and when I found it amongst the other clothes I was moving over to the dryer I noticed the vinyl had completely come away from the fabric. It's not really a big deal because it is still held in place by the bias tape, but it makes it even more crinkly and I just never really use it. The other ones are just so much cuter.

Of course we have to have a few action shots:

Monday, July 25, 2011

Max's Nursery

Everybody says that the 3rd child doesn't get anything just for them. It's all hand-me-downs and no pictures. Well, Max is our 3rd and he is the only one that got a real nursery. When we had Wyatt we lived in a tiny rental house so his crib was in our room because that was the only place we could put it. Sure, all his stuff was new and shiny but we couldn't really decorate and make a cute nursery like you dream about.

When we had Carson, we owned a larger very old home, but the bedrooms were all upstairs in a really odd layout. Basically you got to the top of the stairs and were in the master bedroom, then turned a little and were in another room. Keep walking through that room and you were in Wyatt's room. There was also another bedroom you could get to through Wyatt's room but we used it as storage because it was in pretty bad shape. Carson started out in a pack-and-play in our room because Wyatt was still in the crib. My kids also all woke up every two hours for the first 6 months so it was easier to keep them close to me at night. Eventually Wyatt got a big bed and Carson got moved to the crib and into the middle room. I'm not sure why, but we just never really decorated any of our rooms upstairs in that house, so Carson didn't get a real nursery either.

Right about the time I found out I was pregnant with Max we bought the house that Roger grew up in, and this time I was determined to have a special place for the new baby. When my husband's parents lived in this house, the room that Max is in now was used as a storage room. It was painted an awful shade of blue, had old linoleum flooring, deer heads on the wall, and those awful gold-speckled ceiling tiles.  Needless to say, it was not a room I was willing to let any of my kids sleep in. Late last August when I was about 6 months pregnant, my mom and I painted the ceiling, the walls, trim, and closet doors in there and the room started to become a place where I didn't cringe when I opened the door. Later we had carpet installed and I really got excited about setting up the nursery. 
Wish I had taken these before we lowered his mattress. Skirt looked much better then.
We used the same crib that we had with the first two boys but I made a new crib skirt and matching curtains. It's funny that it has been less than a year since I made these things, but I would do them a lot differently now. I hadn't really gotten into sewing quite as much as I am now and I've seen many other ideas for baby decor that I would probably use instead, but overall I am pretty happy with it. I used this tutorial to make some sheets for the crib. It was so easy and I liked that you just used elastic on the ends, not around the entire sheet.


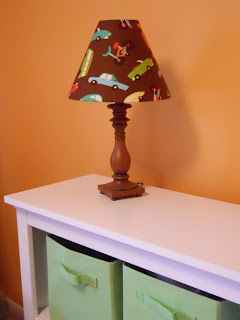
Two things that I still really like are the letters over the crib and his lamp.  I'm not really sure when we got the lamp, but it just had a plain, generic shade on it. My mom and I took the shade apart and used the old covering as a template to cut fabric for the new shade. It is a coordinating fabric in the same Riley Blake line as his curtains and crib sheet. Much better. I got some turquoise spray paint this weekend to paint the base of the lamp which I think will make it look a lot cuter, but I wanted to go ahead and take some pictures of it in case I ruin it!


The letters over the crib were inspired by a picture I saw online somewhere but I can't find it now. Helpful, huh? It was of a really cool kids' playroom with some alphabet letters on canvas. I thought it was Land of Nod or Pottery Barn, but I have searched and still can't find it. It was so easy but I love the simple modern look of it.

I knew we would need some kind of rocking chair in there, and judging by the amount of time I spend nursing at night, I knew it needed to be a comfortable one. I decided against the usual glider and instead got a cushy recliner. Not the cutest thing on the market, but it is so comfortable and we can use it in the living room or den after I'm done with it in here. I was really excited to find this bookshelf at Target. I had been looking for a relatively inexpensive white bookshelf and this one had good reviews and free shipping. Plus, it is called the Carson shelf, so I knew it was meant to be! Right now it holds bins with burp cloths and blankets on the top shelf and random nursing supplies and baby carriers on the bottom.


Taking these pictures of his room made me realize that I really need to put some other art up on his walls. A lot of times while I am sitting in there feeding Max I look around and try to envision how I will redecorate it when he is a little older. I've got lots of ideas, but they will probably all be different by that time!

Sunday, July 24, 2011

Ben's Quilt

ETA: I'm updating this post to link to Lily's Quilts "Small New Blog Meet-Up". Since I have only been blogging for two weeks now I thought it would be a bit of overkill to re-hash my quilting inadequacies in such a short period of time. But, I have actually finished one of the quilts referenced at the end of this post. To see it just head over here. Thanks for stopping by!


I have only made one quilt completely by myself. Cut, pieced, basted, quilted and bound all by moi. And y'all, it was tiny. Well, not tiny, but it was a baby quilt.

It's funny, but when I think of myself as a quilter, the word beginner isn't the first thing that comes to mind, but I totally am.  I really don't know why I think like that. Maybe because the first quilt top I made was back in high school, so that would be at least 13 years ago (yikes!). Not even sure I finished that one. I think I just left the pieces laying around in my mom's sewing room long enough that she finished putting it together.

The next time I attempted a quilt was during my junior year of college. I saw a design in one of my mom's quilt books and decided to try it. But I really didn't see the point in actually figuring out the amount of fabric I needed and making a reasonable sized quilt, so I just kept making blocks until it was huge. Once I had that top finished, I was so sick of it that I left it at my parents' house and told my Mom that I really didn't care what she did with it. Being the saint that she is, my mom hand quilted that sucker for me and then gave it back to me. I'll have to find it and take some pictures.

 My third quilt top was for my oldest son's bed. I got my mom to cut the fabric for me, and after I pieced the top she finished it for me. Sensing a pattern here? Same goes for the quilt for my second son. So the first quilt I really and truly made is the one I gave to my nephew when he was born.

I just realized he is holding it upside down. It's blurry, but the cars are under the road.

Now it's going the right way.


My brother and his wife live in Texas and just had their third child in May. A cute little boy named Ben. I haven't really met him yet, but I'm sure he is delightful. For Ben's quilt I used the Disappearing Nine-Patch tutorial from Cluck, Cluck, Sew using mostly Riley Blake fabrics with a few Robert Kaufman Funky Cars. The binding is a dark brown Kona, maybe coffee? Obviously when I took these pictures I was never planning to start a blog, or I may have tried to stage the photos just a little more professionally. Like maybe not in my living room with kids peeking out.

So there you have it, my first quilt. Right now I have another quilt in my closet all basted and ready to be quilted and am piecing another, so maybe I can at least consider myself an advanced beginner?

Saturday, July 23, 2011

The kids and I did not leave the house today. I cannot remember the last time this has happened on a Saturday. I'm guessing since before Rog started his job at Duke, so, 6 months probably? It seems like we always have something to do on the weekends now, so it was really nice to get to stay home today.  It was a really laid-back day, but we actually got a lot done.

After getting Max down for his morning nap, Rog stayed inside and played with the boys while I enjoyed some quiet time out in the garden. Well, if you call pulling weeds in 90 degree weather enjoyable...Oddly enough, I do! Underneath all the weeds I found several more cucumbers that I missed yesterday and discovered 3 cantaloupe that I hadn't seen before. It seems like the seeds that I planted where I wanted them to grow didn't make it, but when I handed the remainder of the packets to the boys and let them plant the rest everything survived. So we have quite a tangled patch in the garden of watermelon, cantaloupe, sunburst squash and red noodle beans.

I came in and made salsa for lunch with fresh garden veggies, then Rog put the older kids down for their nap. After that he got all the hooks put back up in the mudroom from when I took them down to paint last month. He even got my new shelf from Ikea put up in the dining room. After Max went to sleep I got some sewing done on Rog's quilt that I'm making, then made some pickles. Overall, a surprisingly productive day.

And just to jazz up this post a little, here are a couple pictures from the day.


On Quail and Mud Bogs

Why yes, that is a strange topic, isn't it?

Just a couple of short things this morning...

Last night while the kids were brushing their teeth getting ready for bed, I was in the living room when Rog came running in. He wanted me to come tell him what kind of creature was in our backyard. Seriously? He is the native farmboy, I am merely a suburban transplant, yet he wants me to ID the thing in his backyard? So I go look out the playroom window and see something thrashing around on the ground on top of a mole hill, causing a mini dust storm. In just a couple seconds, my answer...birds...dust bath...looks like quail.  Not quite believing me, he opens the window a little and does a warbly bobwhite whistle. The two quail freeze, shake themselves off, and go on their way. Win.

And now for the mud bog portion. Do you even know what a mud bog is? I had never heard of one until I moved up here. And I come from Tennessee, one of the reddest* places on earth. Tonight is the last night of our county fair and thus, the mud bog is the evening's entertainment. Apparently, the whole purpose of the mud bog is to see who can drive their truck the farthest through a big mud hole in the middle of the grandstands. And amazingly, this is the busiest night at the fair. Also, the most entertaining night for people-watching. Sadly (and this is where a sarcasm font would be handy), I won't be attending the olde mud bog tonight. Rog will be there helping the other fair board guys keep things under control and I really have no desire to take three kids by myself. Can you blame me?

So I will leave you today with a picture of the boys at the fair earlier this week. Why no, I didn't remember to take pictures of my kids while we were there, shockingly enough. But a neighbor snapped this picture of them outside the hog barn and I think its cute.


*Am I the only person that uses the term "red" to refer not just to the color, but to categorize something as being a little on the redneck side of things? I think I may be.

Friday, July 22, 2011

What the heck is a tomatillo??

Tomatillo in the wild...of my garden
When most people ask what I have in my garden, I usually get an odd look when I say tomatillo. Usually they think I just have a weird way of saying tomato. Really, I am a little surprised. Its 2011, dude. Who hasn't heard of a tomatillo yet? Maybe I just read too many food and gardening blogs, but I kinda thought they were a bit more mainstream. After googling them a couple times to find various recipes it has become apparent that there are some misconceptions about them. Some people think they are just green tomatoes, others say you will only be able to grow them if you have more than one plant. They aren't tomatoes, but they are related. They are called "tomate verde" or "green tomato" in Spanish, so I guess that is where some of the confusion comes from. They are more closely related to ground cherries and cape gooseberries. Tomatilloes have a papery husk surrounding them that usually splits open when the fruit ripens. They also have a sticky coating between the husk and the fruit that tastes pretty bad if you don't get it all washed off. The plants look similar to tomato plants and can get a little out of control and sprawl over a large area of the garden.  Not that my garden EVER gets out of control...

Just starting to split the husk


The past two years I have bought two plants from the farmers' market because I read that they wouldn't set a good crop if you only had one. Well, the first year a cutworm took out my second plant and last year one of my boys stomped on one, but both years I had many more than I needed to keep us supplied with salsa verde. And that, my friend, is the best thing to do with tomatilloes. (Is tomatilloes the correct plural form, or is it like deer or fish? Spellcheck doesn't appreciate anything I'm throwing out there...)


This year, I wisely decided to get three plants, just to test the theory and make sure we were completely overrun with tomatillo. All three plants have thrived this year. We are really only at the beginning of the great 2011 tomatillo harvest, but I have already canned one batch of salsa and made a couple fresh batches.  I have also picked a bag full and completely forgotten about them in the crisper drawer of the fridge. Funny how that happens...


Last week my mom was here for a canning/freezing extravaganza and the last day of her visit we made Salsa Verde, or Tomatillo Salsa. When I make White Chili I usually throw some salsa verde in there towards the end of its cooking time. I have also gotten really lazy creative a few times and chucked a pork roast into the crockpot with a jar of the tomatillo salsa and let it cook all day. It smells awesome and makes some really tasty tacos, enchiladas, or anything else where you can use tender, Mexican-inspired pork.  The recipe I use when I am canning is from the Ball Blue Book.

Tomatillo Salsa

5 ½ C chopped husked tomatillos (2 lbs)

1 C chopped onion

1 C chopped green chili peppers (I used a mix of Anaheim and jalapeno)

4 cloves garlic, minced

2 Tb minced cilantro

2 tsp cumin

½ tsp salt

½ tsp red pepper (I used chipotle chili powder)

½ C vinegar (I used apple cider vinegar)

¼ C lime juice


Combine all ingredients in a large saucepot. Bring to a boil, then reduce heat and simmer 10 minutes.  Ladle hot salsa into hot jars, adjust lids and rings, process 15 minutes in boiling water canner.  Yields about 2 pints. 

I canned this in half-pint jars and got 5 full jars .

Here is a crazy side-note...once when I was making my pork roast and threw in this salsa, the garlic in it turned a fascinating shade of greenish-blue. Needless to say, I was a little freaked out, but after a little internet searching, I found that it is a perfectly normal reaction that sometimes occurs when garlic comes in contact with other acidic foods. 

Wash them really well to get that funky sap off!
When I am just making salsa to eat fresh, I quarter the cleaned tomatilloes and throw them in a pan with some onion, garlic, jalapeno, cumin, and salt. Cook just until they break down a little, add cilantro, then whir it in the blender a bit until it gets to the consistency I want. If I have a little more time and don't mind heating up the kitchen a bit, I will roast the tomatilloes, onions, and peppers in the oven for a little while then process them in the blender with the other ingredients. 

I haven't tried it yet, but I have read that to can plain tomatilloes you process them like tomatoes.  I am also planning on freezing some the next time I pick a bunch, so I'll let you know how that turns out.